Getting round XAMPP SSL cert annoyances

I set up multiple vhosts so I could develop a system with:

In my vhosts settings, both domains were using the built-in XAMPP SSL certificate on port 443 for HTTPS.

It took a couple of hours to get the setup working initially, but I swear blind that it worked OK for a week.

Then, today – the day I 100% need to fix the most difficult system design issue arising from client feedback – Chrome started giving me ERR_CERT_AUTHORITY_INVALID errors in my console when the Vue.js app was trying to make XHR requests for data from my API.

I didn’t punch a hole in the wall. Neither did I run up and down the street screaming.I didn’t hurl my Macbook at the wall opposite, shattering the laptop into mangled chunks and knocking divots out of the plaster.

I didn’t punch myself in the legs repeatedly, or screw my fingers into painfully tight fists in my hair until hairs started popping out of my scalp. I didn’t scratch the skin of my arms or my shins.

Because through sheer random chance, I found a StackOverflow post with a hacky fix for the problem:

  1. Note the failing URL from your Chrome developer console – EG https://api.mydomain.lh/api/v1/metadata
  2. Copy-paste the URL into the address bar of a new tab in Chrome
  3. The request will fail – you’ll see an error page telling you that SSL isn’t working for the requested URL.
  4. Click anywhere in the body of the error page
  5. Now… I kid you not… just type the text thisisunsafe on your keyboard. You won’t see anything, there’s no visual acknowledgement that you’re even typing anything… but Chrome will then allow XHR requests (by my Vue.js app, in my case) to the requested domain even though its SSL certificate doesn’t stack up.

Part of me would love to know how the world is meant to fucking work when your ability to do your job is turned off suddenly by some undetectable change in how a web browser decides to treat locally hosted SSL certficates, and the solution is an easter-egg-style cheatcode for your fucking browser that you only find out about through the sheer fucking luck of stumbling on the right comment in the right StackOverflow post. Like, if the person who posted that comment couldn’t be bothered on the day they were bothered, would I be insolubly fucked today?

Anyway, the internet being an intolerable cess-swill of fascism aside, it’s a handy fix, so I thought I might try to half-fix it in my memory by blogging it.

Laravel/eloquent isDirty() & getDirty()

Intro

I’ve done a quick test to exercise a new-to-me part of the Laravel (5.6) Eloquent API:

$model->isDirty();
$model->isDirty("field_name");
$model->isDirty(["field_name", "another_field_name"]);

$model->getDirty();

I want to know when ->isDirty() returns TRUE…

My model

I’ve got an Eloquent model for my contacts table:

namespace App\Contacts;
use Illuminate\Database\Eloquent\Model;

class Contact extends Model {
    // ...
}

Testing…

$contact = new Contact;
echo($contact->isDirty());
//  false

$contact->first_name = "Mek";

echo($contact->isDirty());
//  true

echo($contact->isDirty("last_name"));
//  false

echo($contact->isDirty(["first_name", "last_name"]));
//  true

$contact->save();
echo($contact->isDirty());
//  false
  • isDirty() seems always to return boolean TRUE/FALSE regardless of what attributes you pass: whether you want to check globally (no attributes == any field), for changes to one field (string attribute == field name), or for changes to any number of fields (array attribute == array of field names)
  • Works predictably, as expected, whether I use a model instance corresponding to a new record or an existing record.
  • Also (extra test, not shown here): if I change a field to a different value, $contact->isDirty() returns TRUE; but if I “change” a field to the same value it had before, $contact->isDirty() returns FALSE – which is good: it’s not returning false positives.

Azure Active Directory B2C

Requirement

We’re building an application and we want a reasonably robust, quick-to-configure authentication service. We’ve started testing the water with other Azure services and we thought we’d evaluate Active Directory B2C (Azure AD B2C).

Context

We have a PAYG Azure subscription.

Tenants

From https://docs.microsoft.com/en-us/azure/active-directory/develop/active-directory-howto-tenant#use-an-organizational-azure-subscription

An AD tenant is… representative of an organisation. So it stands for a company. A tenant is a dedicated instance of the Active Directory service. A tenant houses user information about an organisation, including permissions etc.

To allow Azure AD users to sign in to your application, you must register your application in a tenant of your own. Publishing an application in an Azure AD tenant is absolutely free. In fact, most developers create several tenants and applications for experimentation, development, staging, and testing purposes. Organizations that sign up for and consume your application can optionally choose to purchase licenses if they wish to take advantage of advanced directory features.

Um… “you must register your application in a tenant of your own”? I’ll have to get back to you about what that means.

At the moment I’m confused about whether I can use my existing AD tenant – passively created when I signed up for Azure, and which I later linked to our company’s domain, almostalldigital.co.uk … simply by adding AD B2C to it; or whether I need to create a new tenant for that. In which case, can I use the same domain for the new tenant?

In the comments BTL in that docs page:

> In fact, most devs create several tenants and applications for experimentation

Really? is it that easy to create a tenant from scratch? I can have multiple tenants?

MS account replies:

yes and yes, but this assumes you have an Azure subscription already, and a user account that has been given admin access to that subscription (see https://docs.microsoft.com/azure/billing/billing-add-change-azure-subscription-administrator).

Once you have admin access:
– log in to the Azure portal (https://portal.azure.com) using your admin account
– select the “Create a resource” plus/+ option at the top of the left-hand pane
– select the “Security + Identity” option
– select “Azure Active Directory”
– specify an Organizational Name and unique Initial Domain Name
– select “Create”

The new basic tenant will be created with your Azure sign-in account as the sole member of the “Global Administrator” directory role, allowing you to administer it.

Hmm, OK. So that gives me a tiered exploratory approach, in descending order of optimism/ambition:

  1. Add AD B2C to my existing tenant, so I can register an application on almostalldigital.co.uk domain. I’ll try it but I’m worried that, having set up Active Directory for my @almostalldigital.co.uk users, it won’t let me set up AD B2C.
  2. Create another tenant, also for almostalldigital.co.uk, that’s separate, and configure AD B2C on that tenant.
  3. Use some other domain I own, create a tenant for that domain, and register an application that lives in that domain.

NB In reality what I achieved was sort-of like (2), but not really: I couldn’t use the almostalldigital.co.uk domain in the configuration of a new tenant… I ended up with a domain like aadtesttenant1.onmicrosoft.com, as you’ll see… below.

The experience

One of stumbling, eventually (via trying to configure AD B2C in the Azure portal) onto this:

https://azure.microsoft.com/en-gb/trial/get-started-active-directory-b2c/

1 Creating an AD B2C Directory

creating-ad-b2c_01

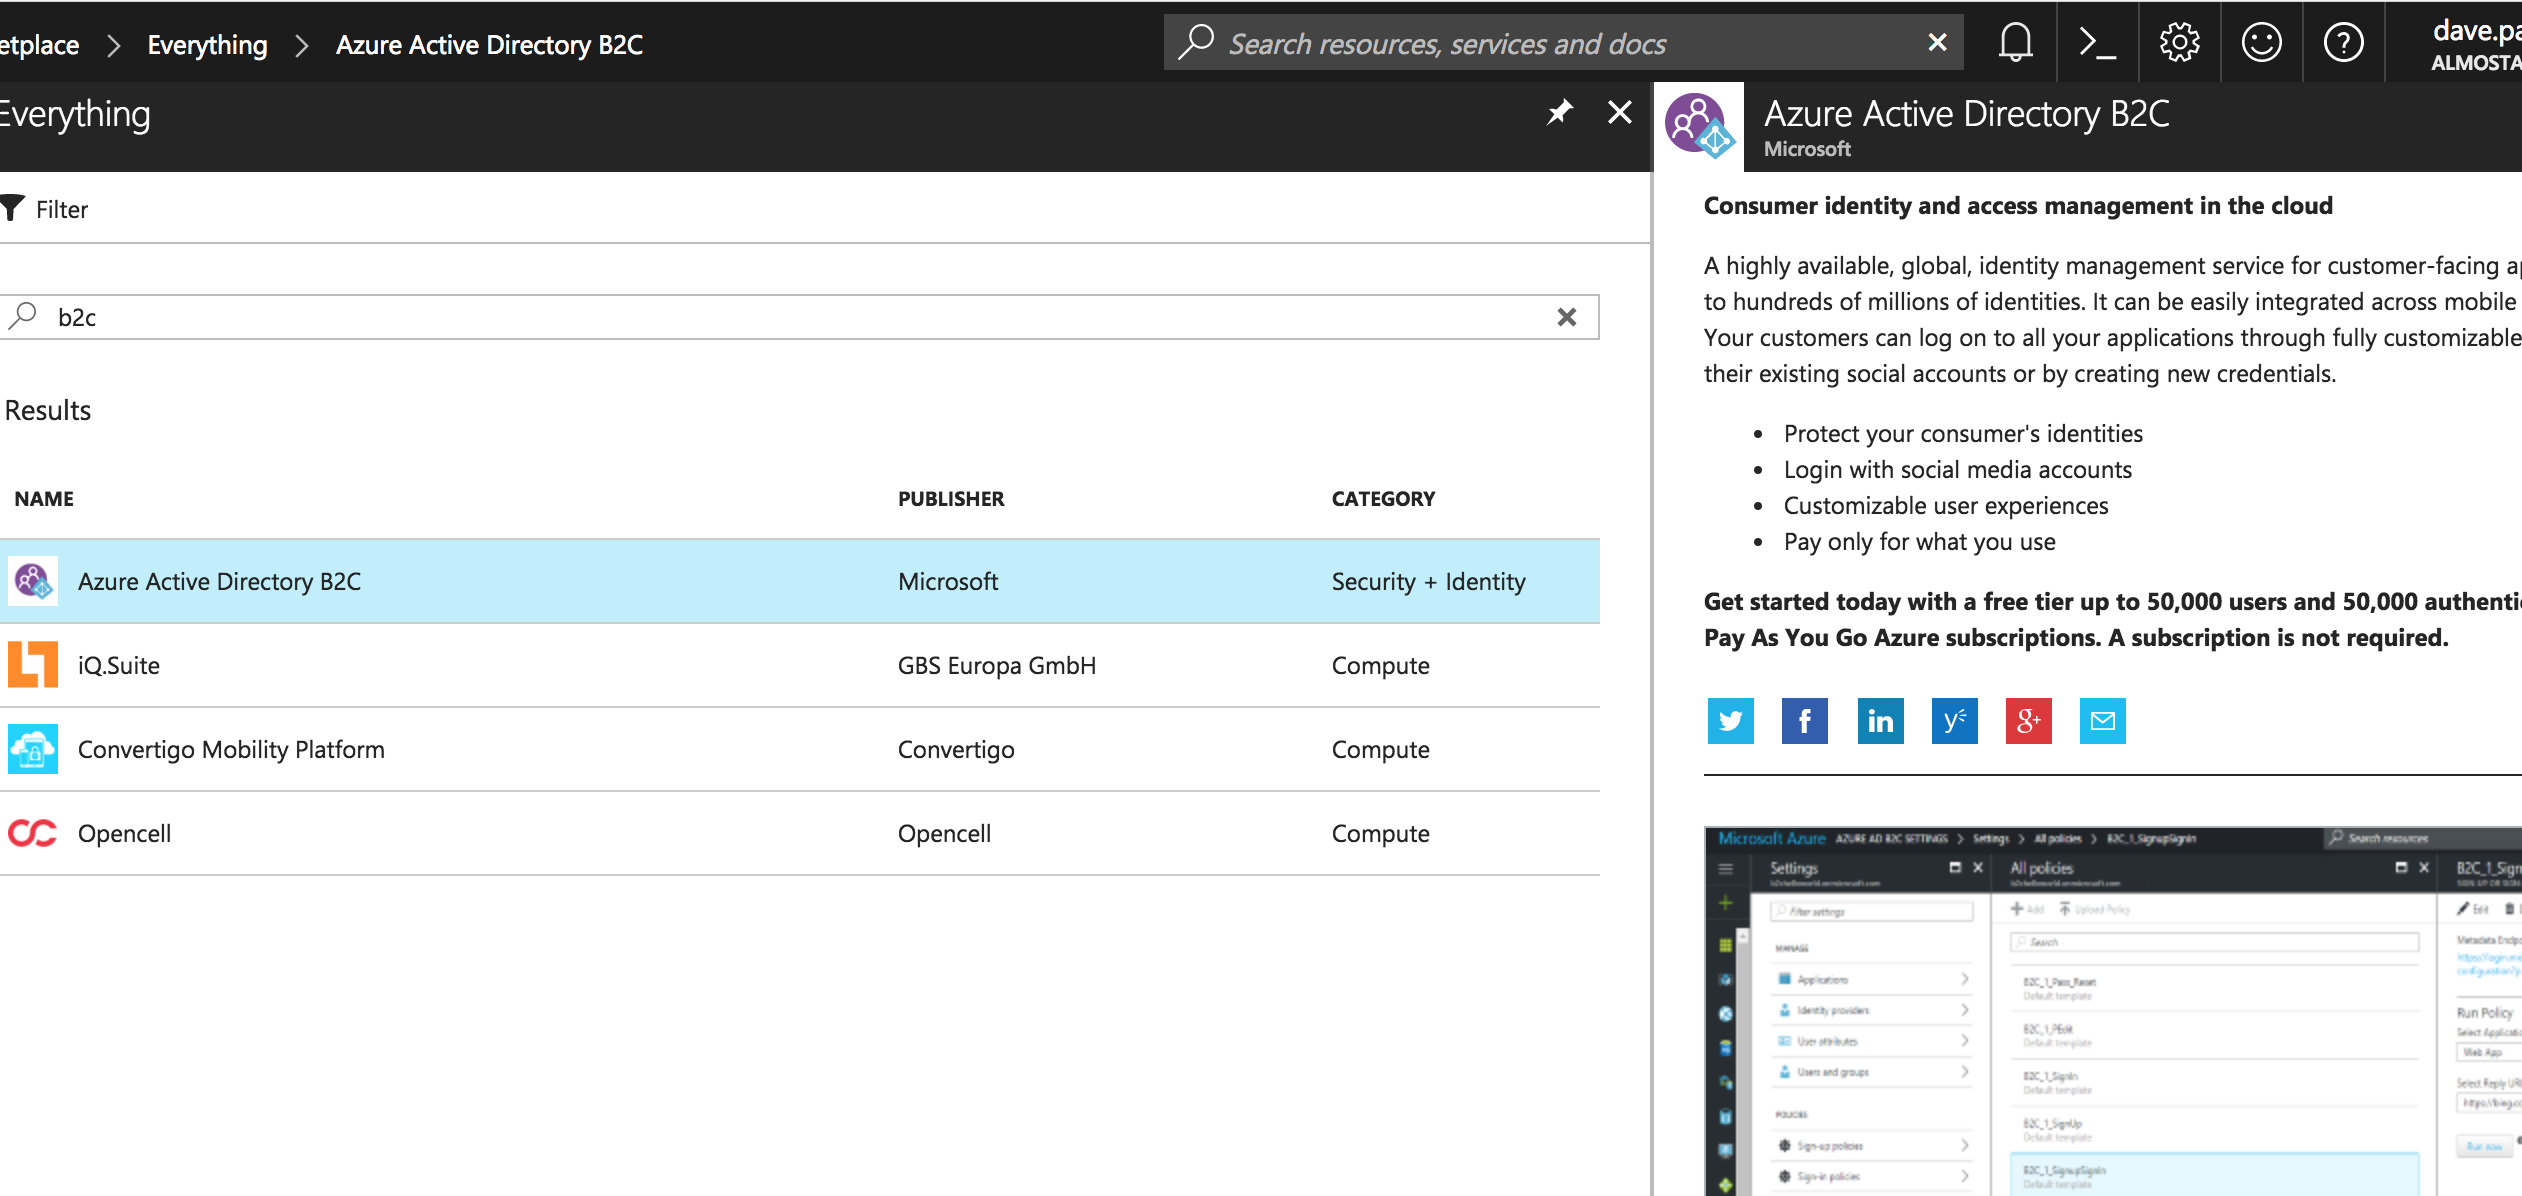
I click the New button at top left of the Azure portal and, in the huge list of things I could create a new one of, search for b2c.

I click on the option to create a new Azure Active Directory B2C.

2 Creating a new tenant

At the bottom of the right-hand panel is a blue button that says Create.

I click it.

Now I see a screen with options to create a new Azure Active Directory B2C tenant, or link an existing tenant to my subscription.

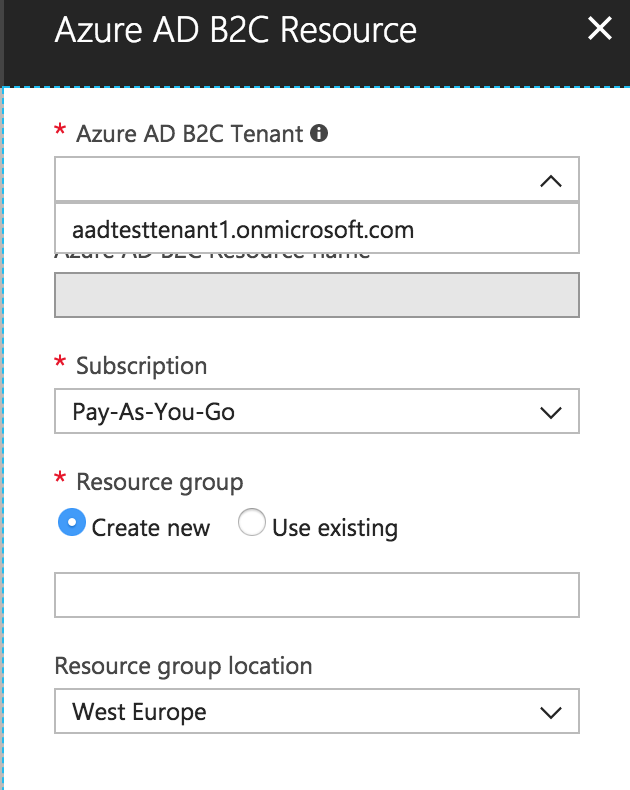
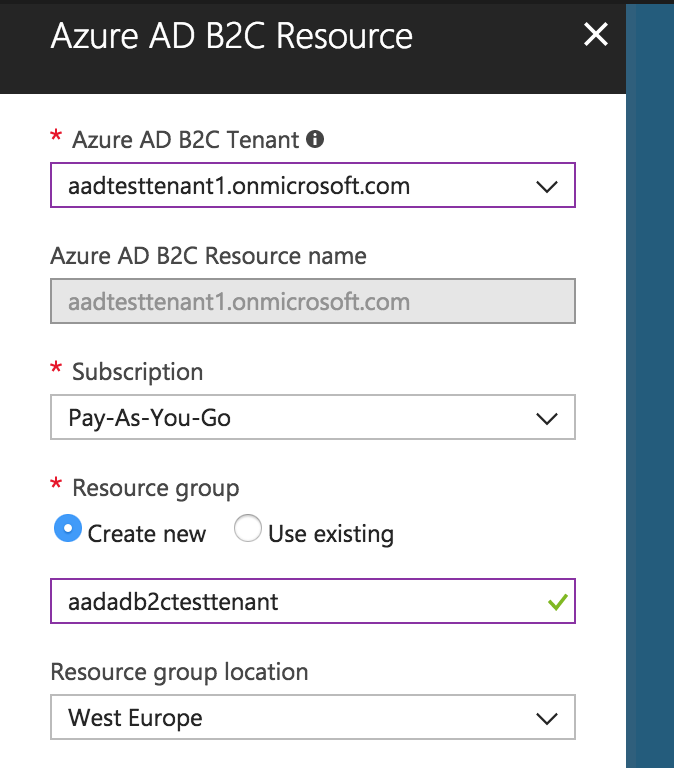
I haven’t ever set up a tenant before, so I decide to try creating a new one. I click that option and on the right-hand side I see a configuration panel:

Screen Shot 2018-01-25 at 15.06.49

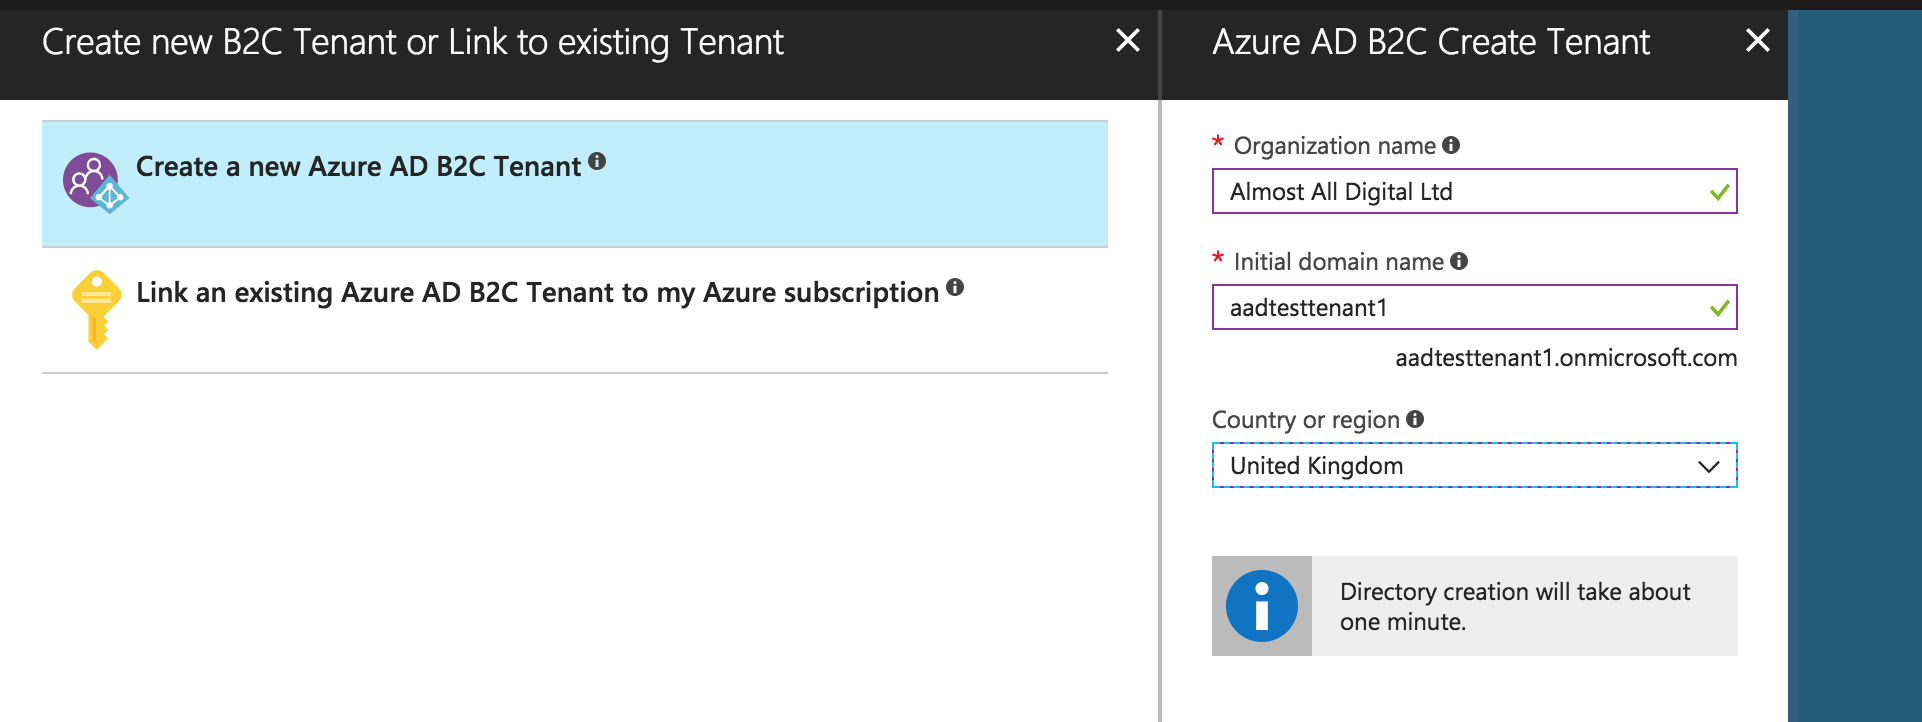
I stumble briefly because I try to set the Initial domain name to almostalldigital.co.uk. The error message says “invalid characters”… it wants a prefix to a *.onmicrosoft.com domain.

I’m slightly surprised for a moment that aadtest and aadtesttenant have both already been used… but presumably there are developers and IT staff all over the world doing the same thing, so I go with aadtesttenant1.

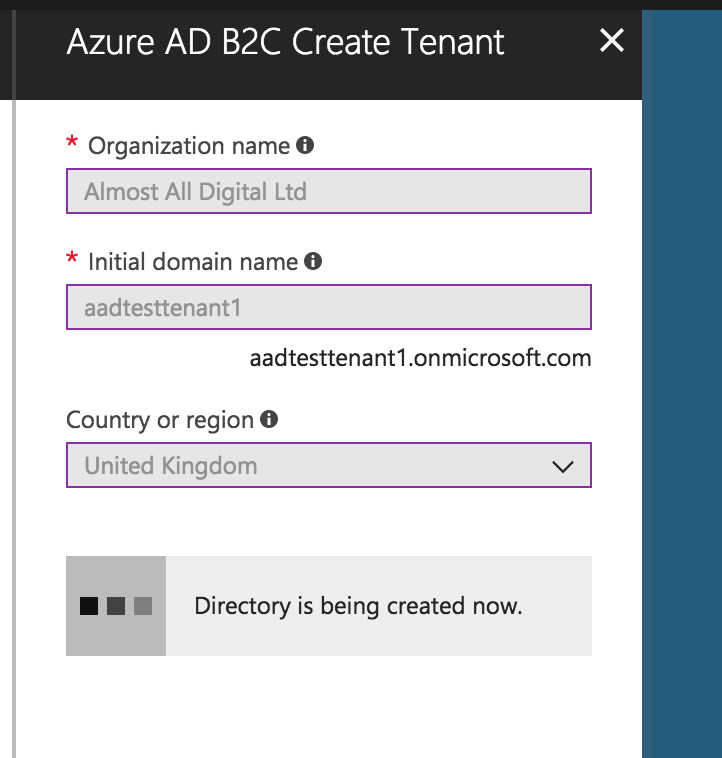
Somewhere, a handful of threads on a containerised server do some work for about a minute:

Screen Shot 2018-01-25 at 15.09.31

3 A moment of optimism

Then I see:

Screen Shot 2018-01-25 at 15.11.30

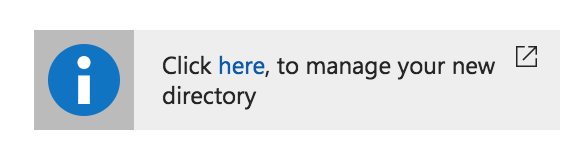
I allow myself to be optimistic. Only for a moment: the puff of dopamine barely registers as a warming in the flavour of my consciousness. But somehow, the Internet picks up on it, perhaps through unpublicised monitoring of the capacitance of my fingertips through my laptop’s replacement keyboard, because next I see:

4 This rubbish

Screen Shot 2018-01-25 at 15.12.24

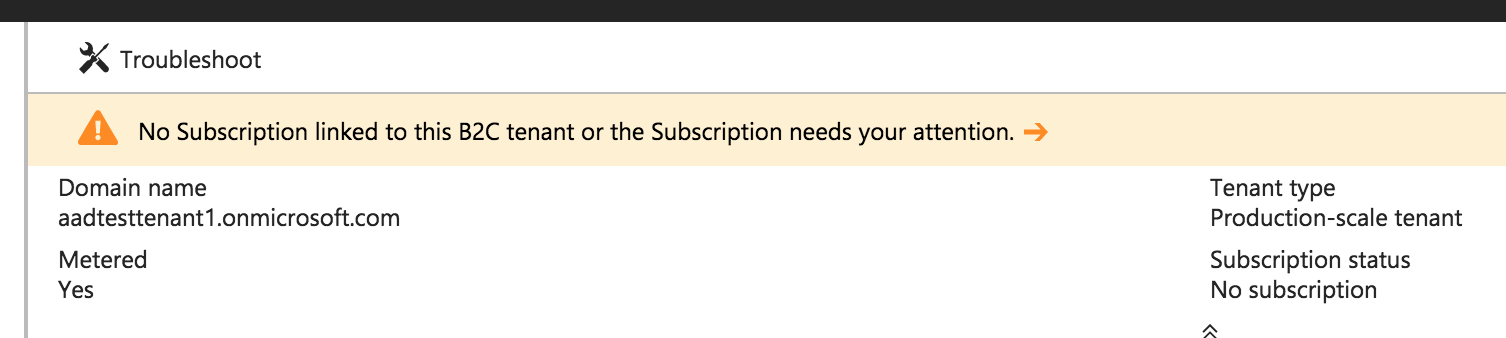
I am disappointed, because I began this process by logging in as an administrator user of an Azure subscription, and worked through the preceding steps.

Screen Shot 2018-01-25 at 15.17.01.png

Oh: in step 3, when I clicked here, the link opened a new browser window, and I tutted because that meant more browser windows, and I closed my existing browser window. I should have rejoiced instead, because the new browser window probably meant that the information I was to view related to a new, different directory. Directory as in, instance of Active Directory as a service.

God, why is configuring a pay as you go federated login and permissions system for a web application running on a completely different hosting platform, and that will scale effortlessly to 100s of 1000000s of users worldwide so DIFFICULT?

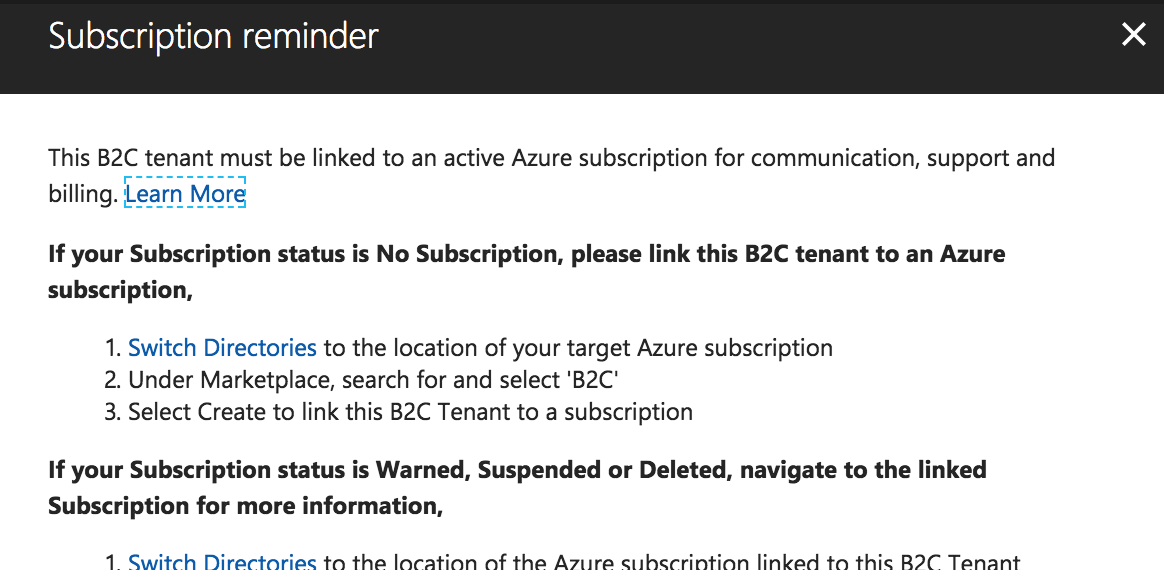
5 Microsoft’s new Switching Directories experience

I’m going to click on the Switch Directories link from section 4, and see what happens…

Screen Shot 2018-01-25 at 15.24.45

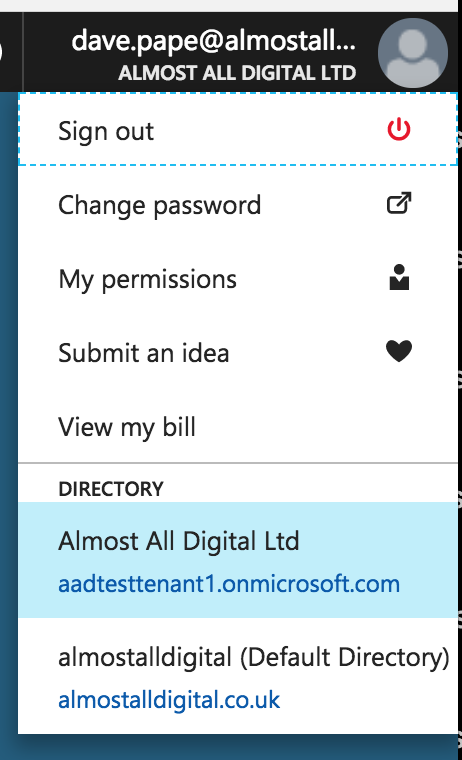
Ah – it triggers the same outcome as clicking on my username in the top right-hand corner of the screen: lots of options to do with my account… and now a list of Directories I could choose between.

They’re confusing to read, because I named my new Directory “Almost All Digital Ltd” which seems more official than the default Directory I set up by initially creating my Azure account. Perhaps I’ll rename it later.

I click on the default Directory… and start again, effectively, from step 1.

But when I see

Screen Shot 2018-01-25 at 15.06.49

At this point… it’s subtle, and maybe points to a hint of over-literal thinking in the way my mind works, but I feel a slight wrongness, because I think of this screen as “the screen you use to create a new AD B2C Tenant”. But no, look, it’s perfectly clear – it’s labelled “Create new B2C Tenant or Link to existing Tenant“. What part of or Link to existing Tenant did I not understand?

I click Link an existing Azure AD B2C Tenant to my Azure subscription.

6 Configuring the link between my Azure subscription and the new Azure AD B2C Tenant I just created

Screen Shot 2018-01-25 at 15.31.18

Another puff of dopamine, albeit less purely warm than the last: a panel where it seems I can configure the link between my Azure subscription and the new Azure AD B2C Tenant I just created. And the tenant appears in the dropdown menu of available tenants.

I try the following:

Screen Shot 2018-01-25 at 15.36.45

7 Success === anticlimax

Screen Shot 2018-01-25 at 15.39.36.png

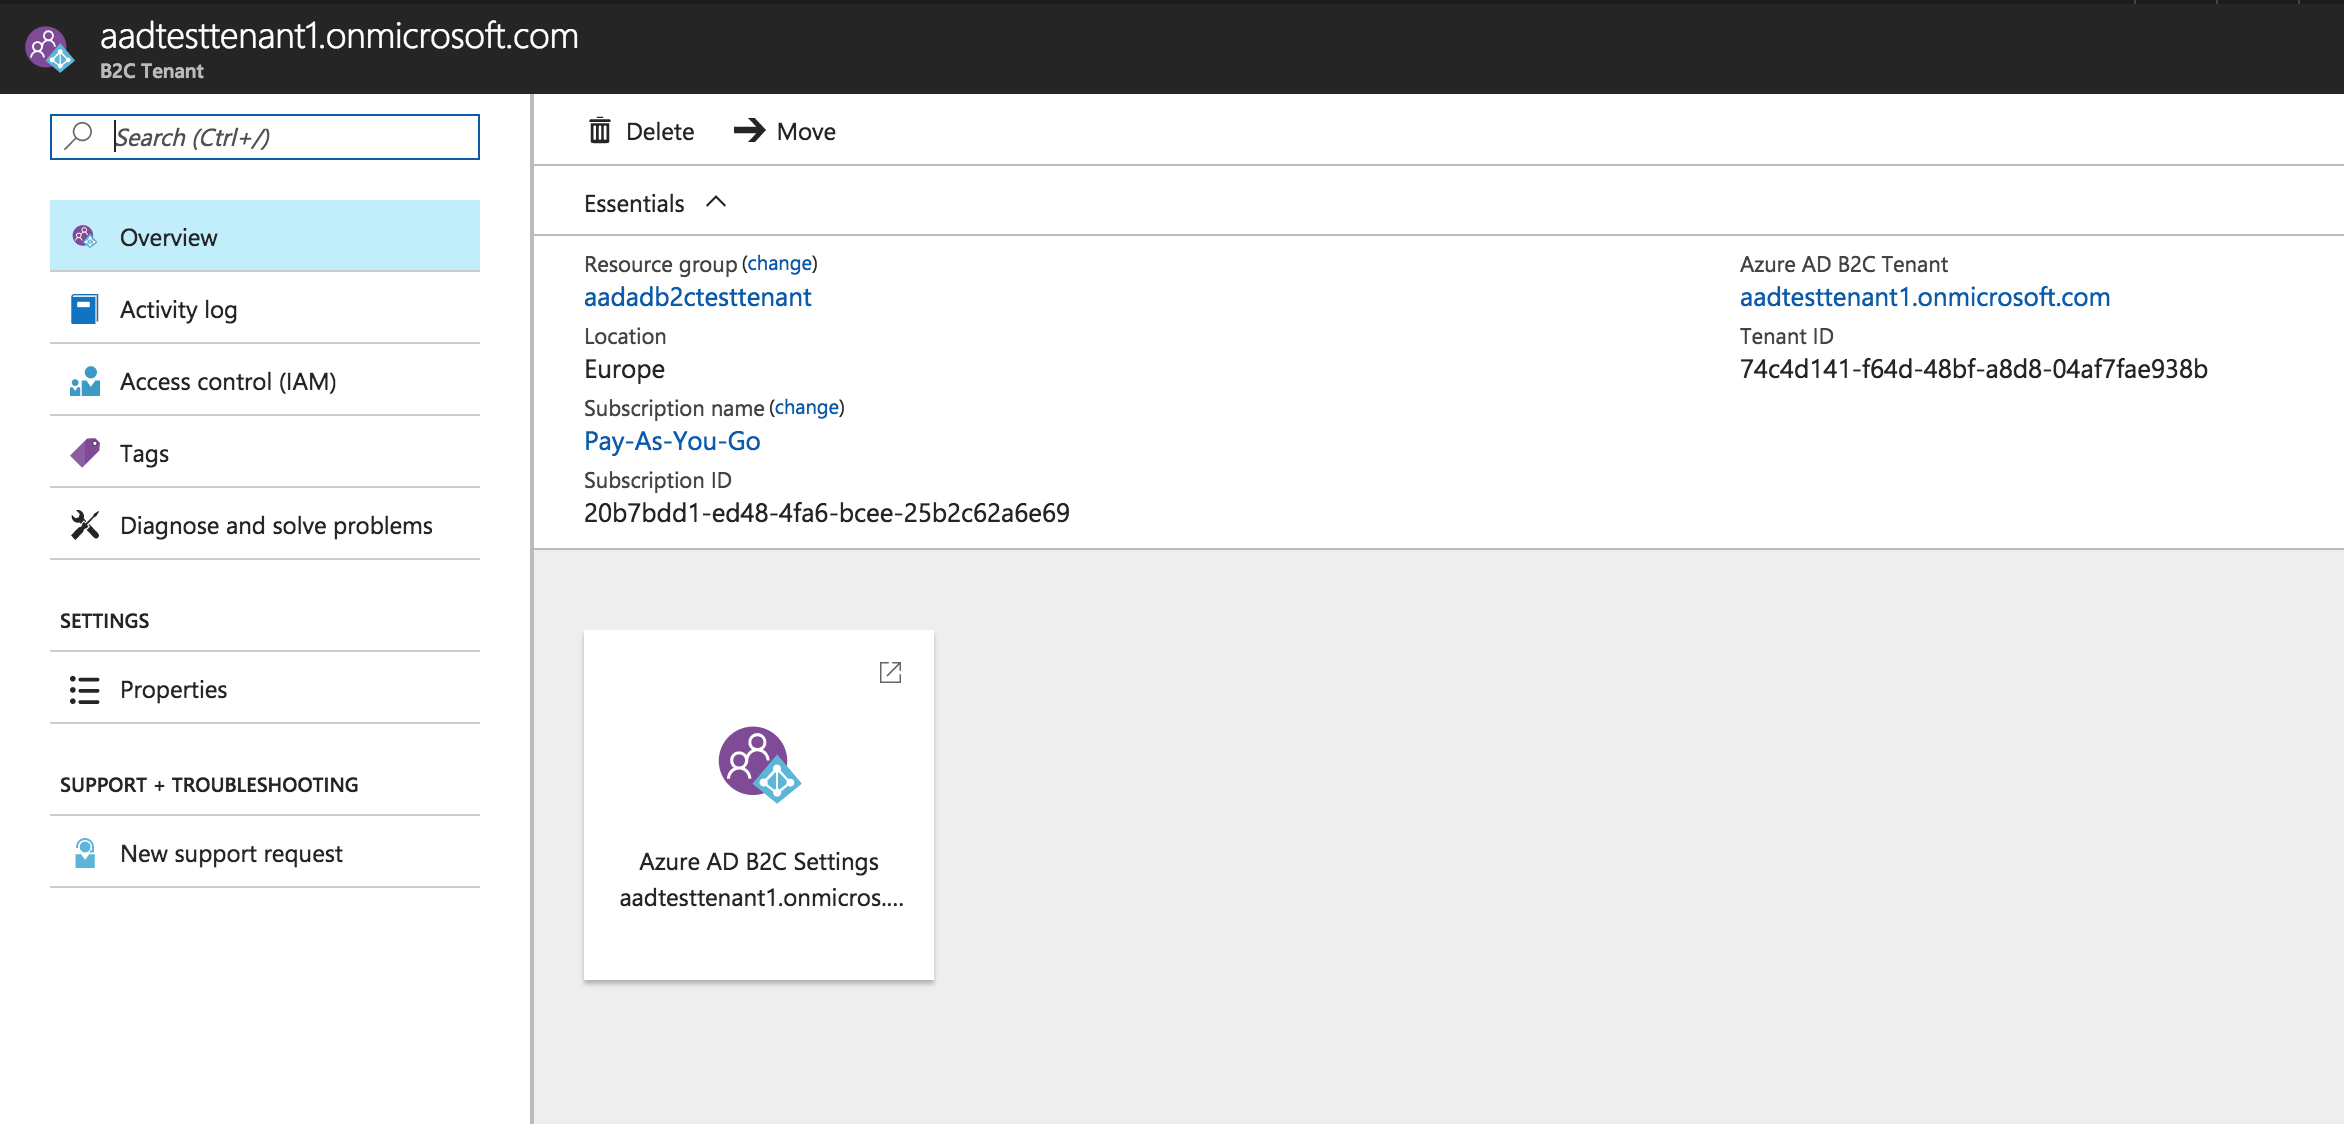
I think everything has worked, as far as it goes; but now, I can’t see how to do the following:

  1. Integrate the authentication service with an application on almostalldigital.co.uk
  2. Add custom user roles (I feel like, in the fullness of time, I’ll need roles like “Customer”, “Moderator”, “Support” etc)

Maybe that’s OK: maybe stepping through that 7-step process 1.857143 times is the first leg of my journey. I watched a video earlier today where a Microsoft product manager repeatedly referred to logging in as a user “journey”, and signing up as a different “journey”. So, perhaps there’s a three-masted ship anchored in the bay, silhouetted against the light of dawn, and I’ve just pushed a rowing boat off the sand into the shallows. Maybe now I can row to the ship; maybe then I can climb a rope ladder up to the deck; maybe then I can plot a course; maybe then I can set off on a year long journey South, around the Cape, passing the Gulf and eventually landing in a metaphorical Asia, where lies the answer to the challenge of adding a login screen to some fucking web page I wrote.

Coming up: Part 2

Initialising a Lumen/Vue project

Challenge

I want to create a single-page application in Vue.js that talks to a Laravel Lumen PHP REST API.

This is because I want to use some legacy Laravel packages in the API, and I’m more comfortable with PHP on the server than JS: I’d rather learn Vue.js by itself right now, than take on Node JS/Express JS development at the same time.

I’ve been learning how to use Vue.js itself; and I know how to create Lumen PHP applications. But I haven’t yet set up a workflow that allows me to work on an overall application that, between the server and the browser, uses both, and has the following qualities:

  • Allows me to use MySQL/Redis as data store servers
  • Uses a system like Webpack or Browserify to bundle assets related to Vue.js, and allow ES2015 language features
  • Watches public web directories and automatically bundles assets in response to changes in those directories

Attempt 1 – Gameplan

  1. Use Laravel Homestead to set up a virtual machine.
  2. VM needs to host two subdomains from separate directories: http://www.example.dev and api.example.dev
  3. Enable HTTPS for both subdomains
  4. Install Lumen in api.example.dev, and create a test API endpoint that will return some JSON
  5. Create a test http://www.example.dev/index.html, and verify that it’s being served OK
  6. Install Vue.js + NPM infrastructure so I can develop a Vue SPA, with asset files bundled automatically when code changes… but without NPM spinning up a localhost server

Attempt 1 – How it went

  • First impressions are, it’s fairly straightforward
  • I updated my versions of VirtualBox and Vagrant
  • I installed a homestead box in my Users directory
  • Did some very basic configuration to the Homestead.yaml file, to configure Nginx
  • Nginx is happy to serve 2 applications, one for each subdomain
  • Nginx seems to offer a snakeoil-style SSL certificate, so although Chrome complains, I can serve content over SSL by default
  • It was easy – familiar because I’ve used Laravel and Slim PHP application frameworks – to set up an API endpoint that serves some test JSON

Attempt 1 – Webpack

I had some Vue.js tutorial projects that use webpack for bundling project assets into a build.js file, and – I think – to run a Node/Express webserver to serve up the resulting content. Webpack was configured to bundle project assets whenever they changed. In the past I’d run all this by typing

 npm run dev

…into a command prompt.

What I want to achieve, though, is to have webpack watch for changes to my code and compile a build.js for me… but I don’t want the Node/Express mini-server to serve the content for me.

I wasn’t sure whether I could get this going easily. Here’s what I did:

  • Copied one of my tutorial Vue apps (the whole folder structure) into the public webfolder of the relevant Homestead app (the directory from which Homestead will serve http://www.example.dev) – so VirtualBox/Vagrant/Homestead would serve the content. At this point, the Vue app does not work, because /src/build.js is not being compiled
  • In my local file system –  IE on my Mac, not the Vagrant VM – I installed webpack globally:
npm install -g webpack
webpack --watch
  • When I navigated to http://www.example.dev, or refreshed my browser window, the Vue.js application was working OK: webpack must have created a build.js file.
  • Changed some code in a Vue file – IE made a code change that would only be visible in the browser if webpack recompiled the build.js file
  • Refreshed my browser window… and the Vue.js project looked OK.

Webpack & Vue.js project

So now, I know that I can call webpack and tell it to bundle project assets when assets are changed, using the CLI command webpack –watch.

But the tutorial I’d been following used the command npm run dev. I wanted to know the relationship between the two commands.

The answer is in the application’s package.json file – the file which defines application options and dependencies for NPM. The file contains the lines

...
"scripts": {
 "dev": "cross-env NODE_ENV=development webpack-dev-server --open --inline --hot",
 "build": "cross-env NODE_ENV=production webpack --progress --hide-modules"
 },
...

I think, when I type npm run dev, it’s running the script defined in scripts.dev.

I tested this by (backing up package.json and) overwriting scripts.dev with

cross-env NODE_ENV=development webpack --watch

And now, I can call node.run dev at the command line, and my application is served, webpack watching the public web directory as expected.

Unlocking MySQL table locks

I’ve built a PHP web app that’s used quite heavily for some moderately intensive MySQL queries.

There’s an issue with it: every so often, I see PDOExceptions with the message:

SQLSTATE[40001]: Serialization failure: 1213 Deadlock found when trying to get lock; try restarting transaction

I haven’t managed yet to trace exactly what the problem is, or what’s causing it… but I was Googling how to make MySQL drop locks, and found this StackOverflow post that I thought was quite useful:

# Log into MySQL
mysql -u your_user -p

# Show tables that are being used
mysql> show open tables where in_use>0;

# Show what processes are running
mysql> show processlist;

# Kill a process that's (presumably) locking a table
mysql> kill put_process_id_here;

Getting a local Git repo linked to a remote (Bitbucket) repo

Create a Bitbucket repo

I created a private git repo on Bitbucket.

SSH authentication

I created a SSH private/public key pair on my Mac:

$ cd ~/.ssh
$ ssh-keygen
Generating public/private rsa key pair.
Enter file in which to save the key (/Users/me/.ssh/id_rsa): test_rsa
Enter passphrase (empty for no passphrase): 
Enter same passphrase again: 
Your identification has been saved in test_rsa.
Your public key has been saved in test_rsa.pub.

I left the passphrase empty because I didn’t want Bitbucket to prompt me for it on every push.

I uploaded the public key to Bitbucket:

  • In Bitbucket I navigated to My Account > Settings > Security > SSH Keys
  • I clicked Add SSH Key.
  • On the Mac I ran cat ~/.ssh/test_rsa.pub | pbcopy
  • I pasted the result into the Bitbucket screen, and saved the key pair

Initialise local repo

$ mkdir /path/to/your/project
$ cd /path/to/your/project
$ git init
$ git remote add origin git@bitbucket.org:myusername/myreponame.git

Create some content

$ echo "Hello world" >> test.txt
$ git add --all
$ git commit -am 'Initial commit'
$ git push -u origin master

For me, this FAILED.

I don’t know if it’s something very specific to my configuration, but none of the quickly-accessible Atlassian KB pages or Stack Overflow pages helped.

UNTIL I looked in an existing local repo’s .git/config file:

... some config...
[remote "origin"]
    url = https://username@bitbucket.org/username/reponame.git
    fetch = +refs/heads/*:refs/remotes/origin/*
...more config...

When I overwrote my “broken” local repo’s config, so it used a HTTPS version of the remote repo’s URL, I could interact with the remote repo without having to give a password.

Securing Apache: disabling SSLv3

A client of mine is seeking PCI compliance and one of the aspects they were failing on was that an Apache web server was allowing access over SSLv3.

To disable it, here’s what I did (as root user):

me:/etc/apache2#cd /etc/apache2
me:/etc/apache2#grep -i -r "SSLEngine" *
mods-available/ssl.conf:    SSLProtocol all
me:/etc/apache2#nano mods-available/ssl.conf

[Edits ssl.conf]
[Finds line SSLProtocol all; changes it to...]

SSLProtocol all -SSLv2 -SSLv3

[Saves changes to ssl.conf]

me:/etc/apache2#service apache2 restart

Ubuntu 14.04 shell script to pull updates from a Bitbucket repo

  • You’ll need to create a public/private RSA key pair (see here for details)
  • The eval and ssh-add lines make sure SSH Agent is active
  • git reset –hard is maybe a little bit strong, but there you go
#!/bin/bash

eval `ssh-agent -s`
ssh-add /path/to/rsa-key-file-name

cd /path/to/repo-root

git fetch
git reset --hard origin/master

#echo "Finished."